
IRL Belabox Cloud Setup Guide for Android and Windows
IRL-Android-Windows
Japanese translation: https://techdump.murasama.net/irl-belabox-cloud-setup-guide-for-android-and-windows-jp/
General Info
This Guide describes a Low Cost and Easy Solution for
- better user viewing experience for IRL-Streaming
- Android as Streaming Phone
- Windows as Home PC
Detailed Overview: https://techdump.murasama.net/belabox-cloud-guides-overview-en/
[NOTE]
There are completely “free” methods, but they require more technical expertise and if wrongly configured, could be a security risk for your Home PC. With this method, you don’t purposely open any holes in your network and system security. (No fixed IP | No Port Forwarding | No Firewall Changes).Additional important security/privacy details here (make sure to read all of this carefully): (https://techdump.murasama.net/belabox-cloud-guides-overview-en/#security-and-privacy)
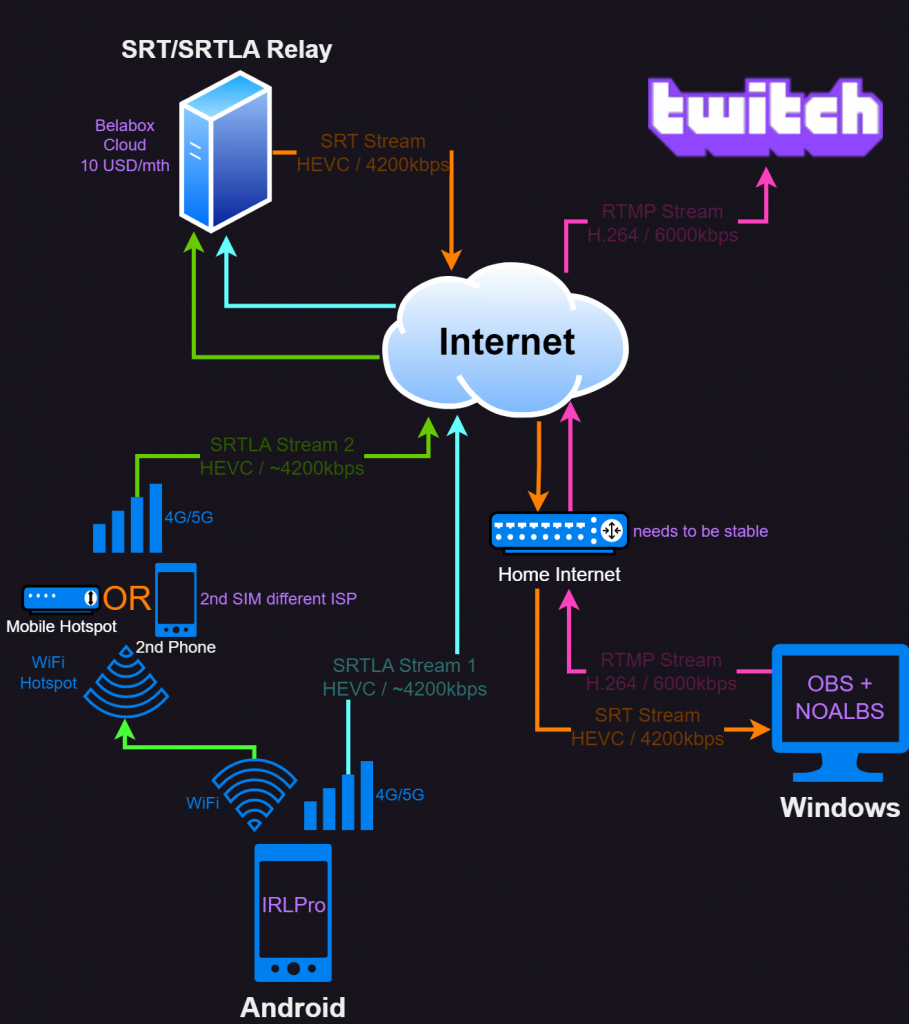
Map
1 – Streaming Phone
[NOTE]
If you have multiple phones, please use the newest/best performing one as the Streaming Phone
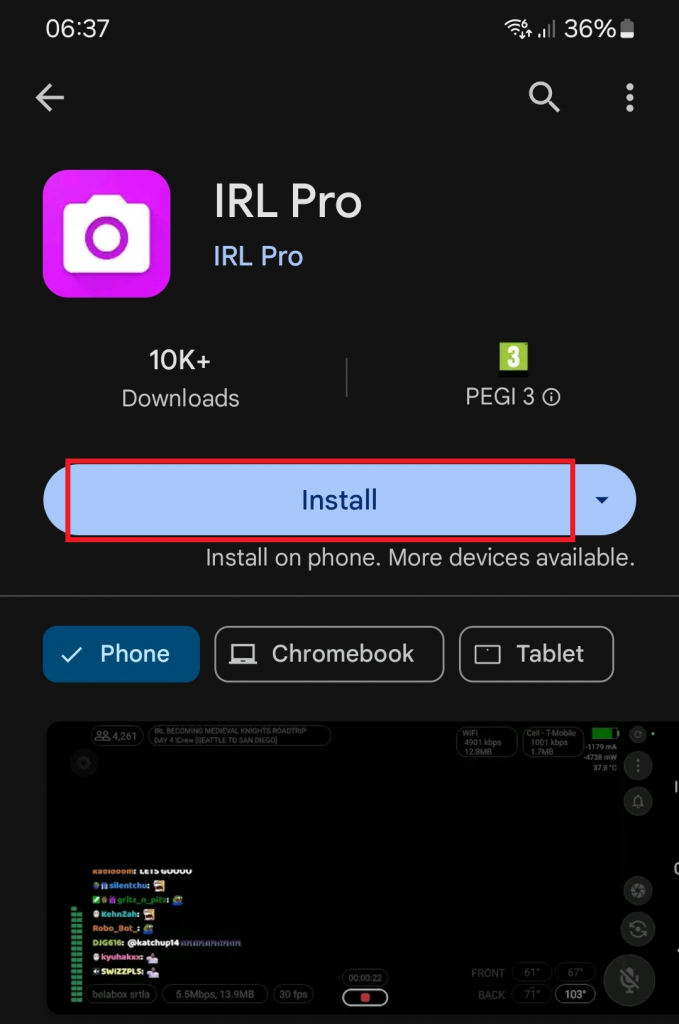
1.a – Install the IRL Pro from the Google Play Store
2 – SRT/SRTLA Relay
[NOTE]
This relay server takes the Two SRTLA Streams and combines them into one SRT Stream as seen on Map
[IMPORTANT]
This Service costs USD $10/month
2.a – Create an Account with Github (If you already have one skip to Login)
- You then need to Verify your E-Mail Address and Login
2.b – Once logged in open the Belabox Sponsorship Page
- Scroll down and select the $10 a month Tier which includes 1x SRT/SRTLA Relay Server
- Fill out your Billing Info and setup your Payment Info (Only Credit Card or Paypal supported)
- Alternatively you can also let your Viewers buy Vouchers for multiple Months.
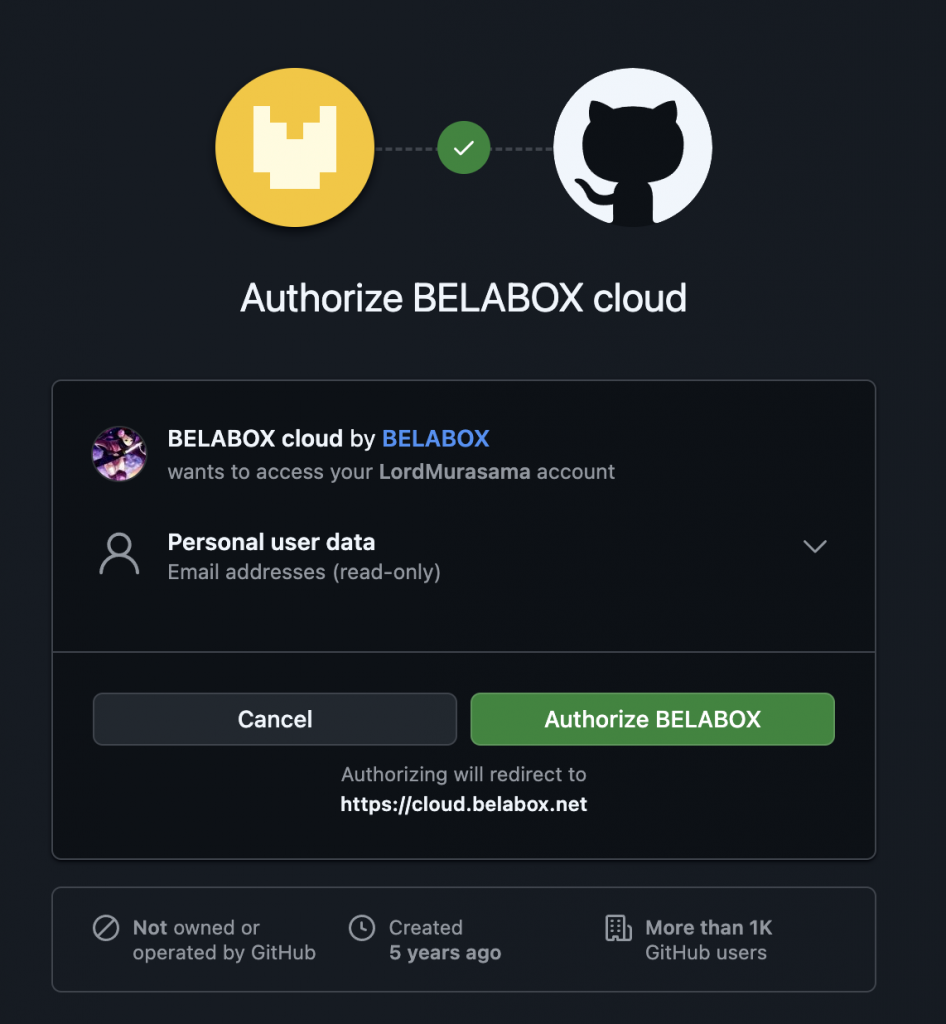
2.c – Once you either sponsored or have a voucher, open the Belabox Cloud Page and
- Login/Authorize with your Github Account
2.d – On the Top of the Page press the 3 Lines then SRT(LA) relays
2.e – Click on Add and change the Name. Change the Server to your closest Location
2.f – Scroll down until you see IRL Pro Settings and tap the Add automatically to IRL Button to automatically add the correct Info in IRL Pro (the following URL in the screenshot is sample data).
3 – Streaming Phone
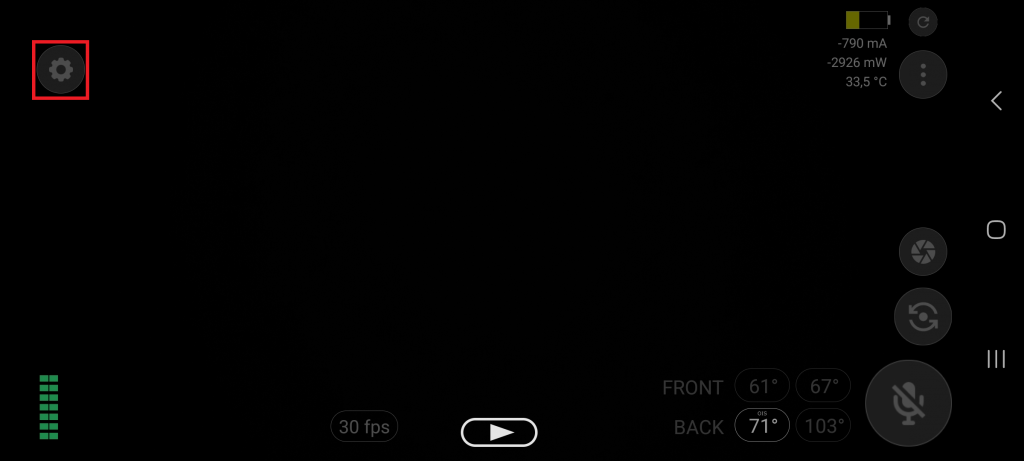
3.a – Open the IRL Pro App and go to Gear Symbol (Settings) on the top left
3.b – Go to Connections where you should see the Belabox Cloud. Tap on New connection.
3.c – Tap on TWITCH.TV on top and fill out your Username and your Streamkey and hit save
3.d – Go back to the Menu and tap Streamer
3.e – Tap Twitch Username and add your Username and ok. Scroll down and enter your Streamlabs API Key. (If you ever need to change any Chat settings, return here again)
3.f – Go back to the Menu and tap Video
3.g – Go to Video and set the following settings
- Resolution: 1920x1080p
- FPS: 30 fixed rate
- Bitrate matches resolution: Off
- Bitrate: 4500 kbps
- Format: HEVC
3.h – Go back to the Menu and tap Overlays then to Web Overlays
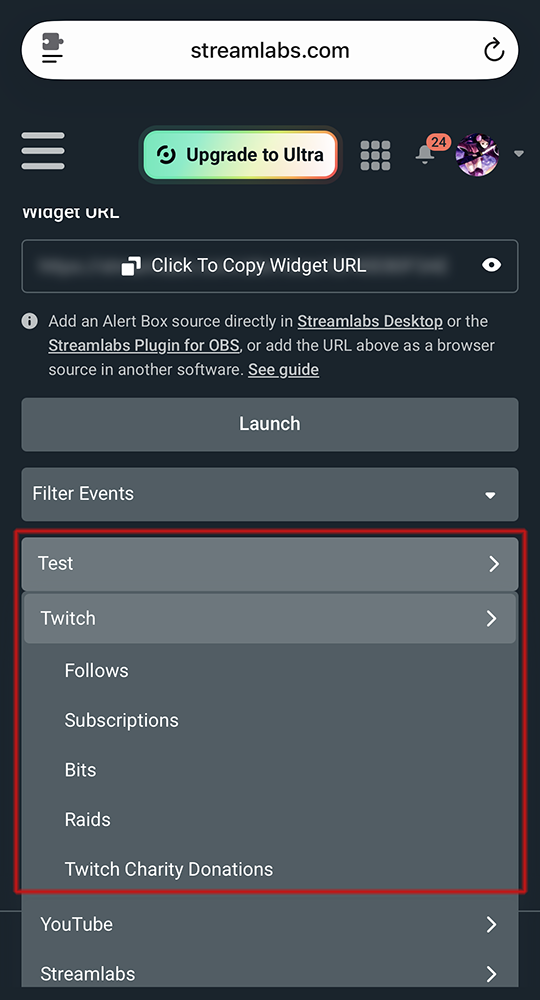
3.i – We want to add Alerts to IRL Pro. To do this we go into our Alerts Dashboard via Browser
- Streamlabs and copy the Widget URL


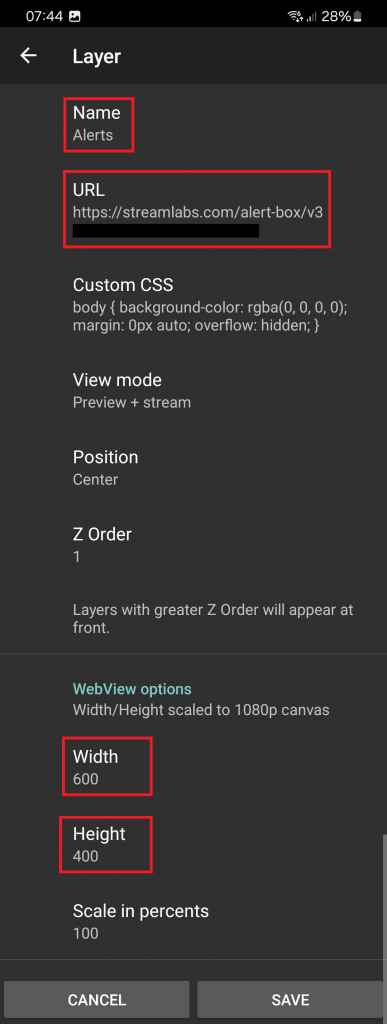
3.j – Switch back to IRL Pro and add a New web overlay
- Name: Alerts
- URL: Paste the one you copied from Streamlabs Alertbox
- Width: 600
- Height: 400
( change these later if the Alerts are the wrong size or position)
3.k – Once saved, check that Alerts is turned on.
3.l – Go back to the Main View and check that Chat is loading and test that Alerts are working
- Streamlabs (Test-Alerts are available in the Alertbox)
4 – Windows-PC
Any normal PC or Laptop can be used (preferably with hardware NVENC encoder/decoder for better stream performance), best cabled directly to your Home Internet Router.
[!WARNING]
This PC needs to have a STABLE Internet Connection during the whole stream with at least 6Mbit Upload Speedtest
4.1 OBS
[!NOTE]
This is the Program that gets the Stream from the Relay Server and converts it back to old RTMP/h.264 Standards and streams it directly to Twitch. Here you have a lot of Options to set Videos, Text, Music to engage/entertain your viewers while you reconnect
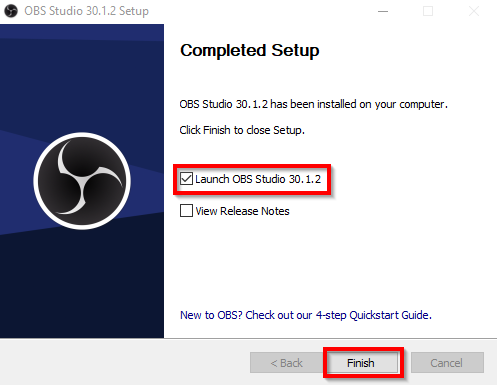
4.1.a – Download OBS Studio for your System
4.1.b – Install OBS Studio and Launch it.
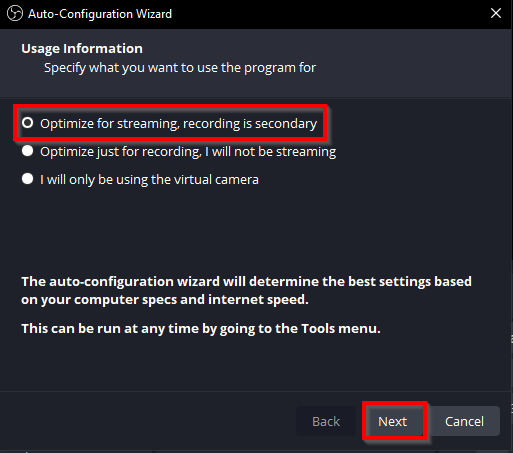
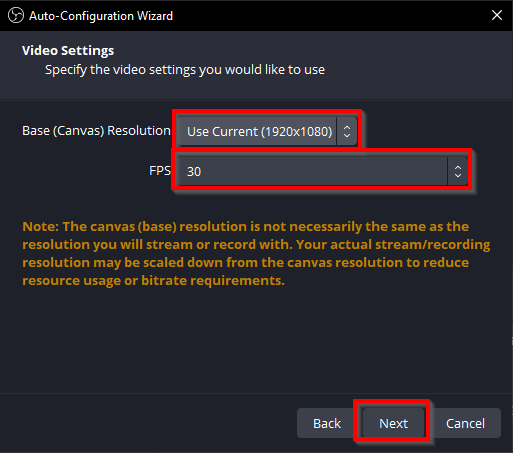
4.1.c – In the Auto-Wizard
- Optimize for Streaming
- Resolution: 1920×1080
- FPS: 30
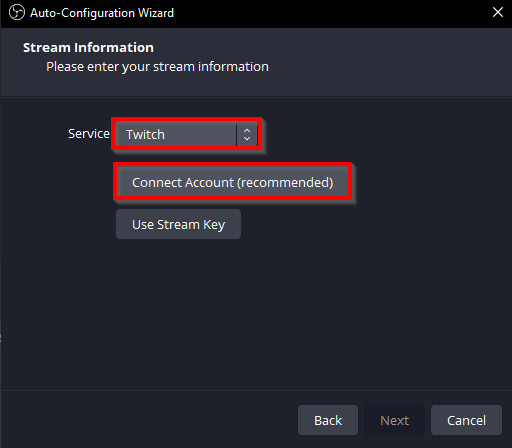
- Service: Twitch
- Connect Account
- Log in the newly popped up Window.
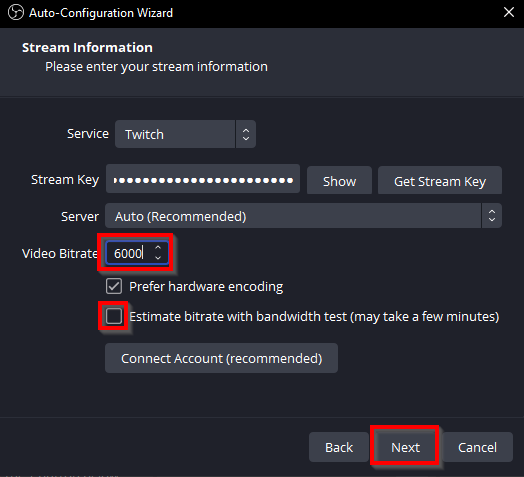
- Uncheck the Estimate bitrate and enter manually 5900 (7900 if you’re Twitch Partner)
- Finish the Wizard
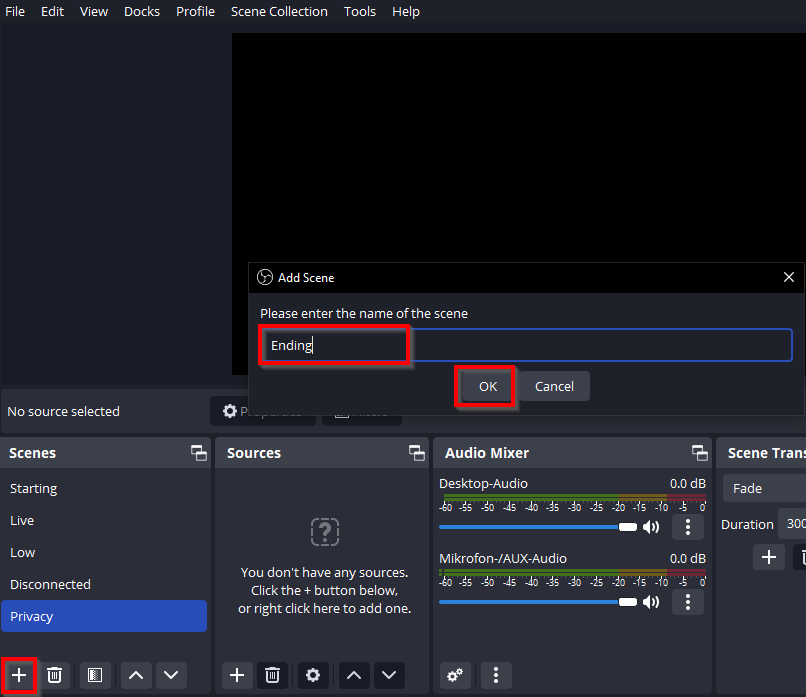
4.1.d – In OBS on the bottom left add now following scenes
- Start
- Live
- Low
- Brb
- End
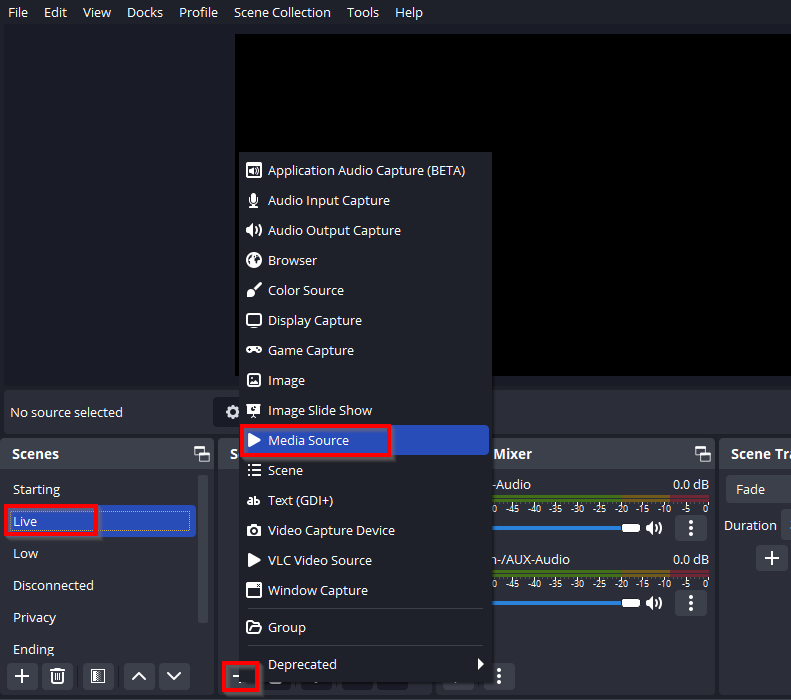
4.1.e – Click on the Live Scene, and add a Media Source and with name Belabox Cloud.
- A new Window with settings will open
4.1.f – Open the Belabox Cloud Page
- go to SRT(LA) relays
- scroll down until you see OBS Media Source Settings (copy the URL information)
- Note: the input URL information in the following screenshots are sample data only (make sure to use the information that is from the Belabox Cloud page.

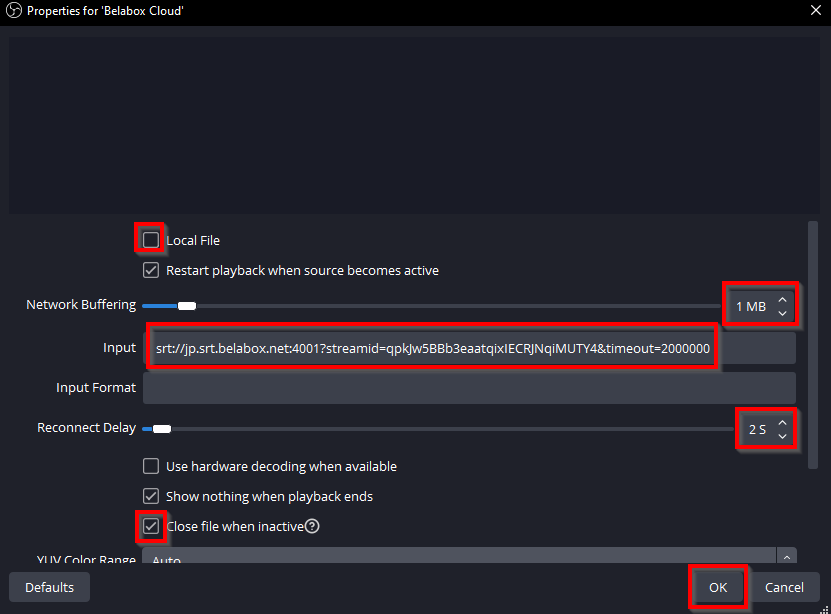
4.1.g – Go back to OBS and set (paste) the same settings
- Uncheck Local File
- Set Network Buffering to 1 MB
- Copy Input from Belabox Cloud Page
- Set Reconnect Delay to 2S
- Check Close file when inactive
4.1.h – Right-click on the Belabox Cloud-Source, then Transform and Fit to Screen (or select it and hit CTRL+F)
4.1.i – Then Copy (CTRL+C) the Belabox-Cloud-Source over to the Low Scene
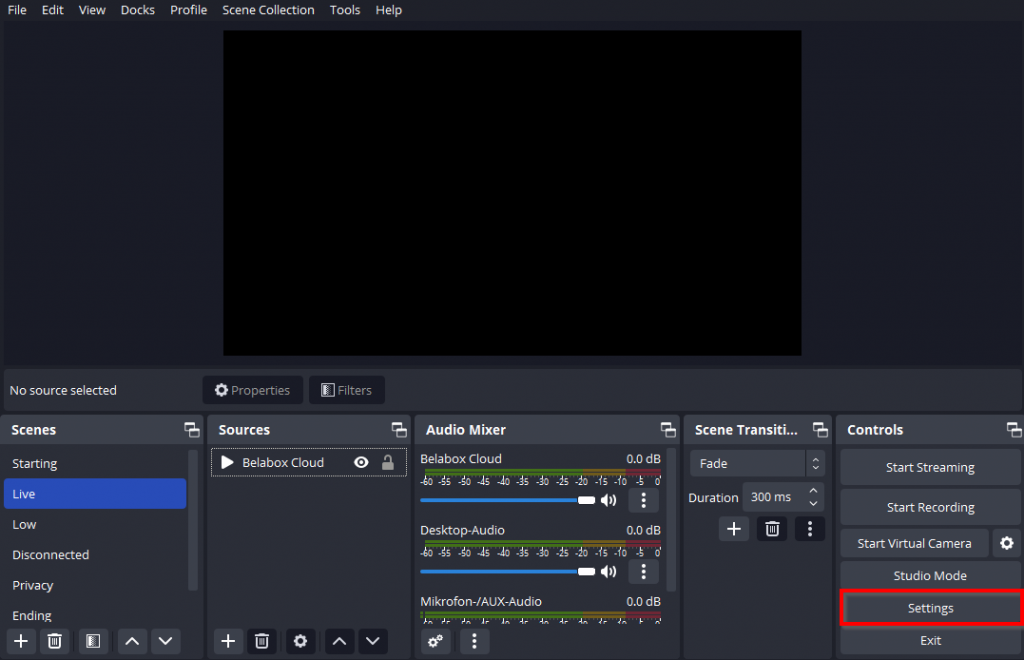
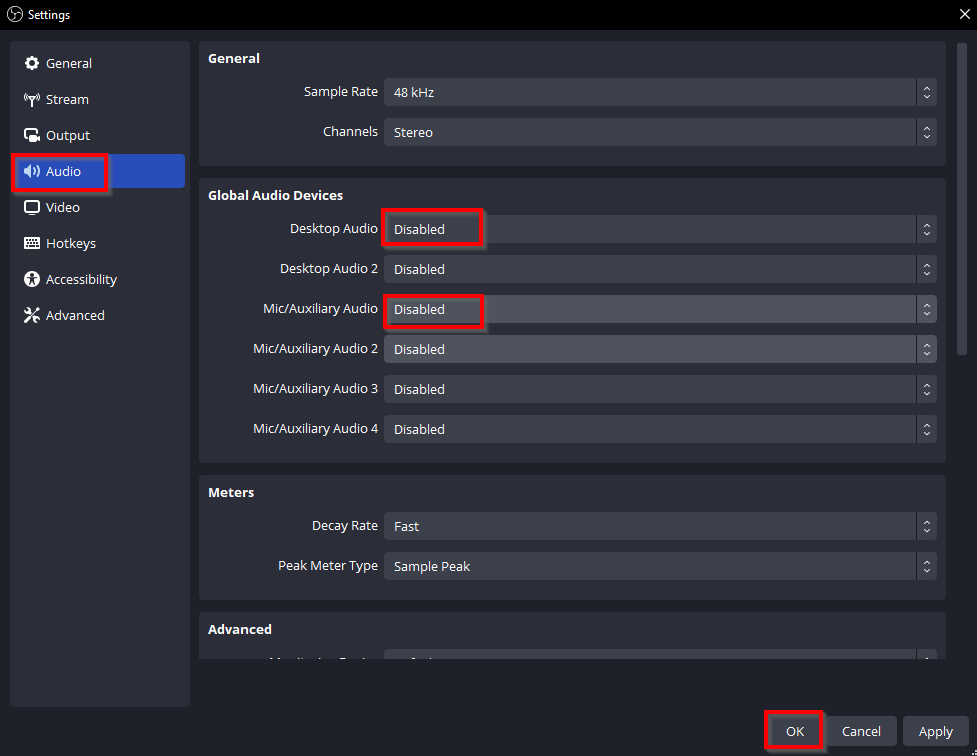
4.1.j – Go To Settings on the bottom right. In the new Video select Audio and Disable all Global Audio Devices
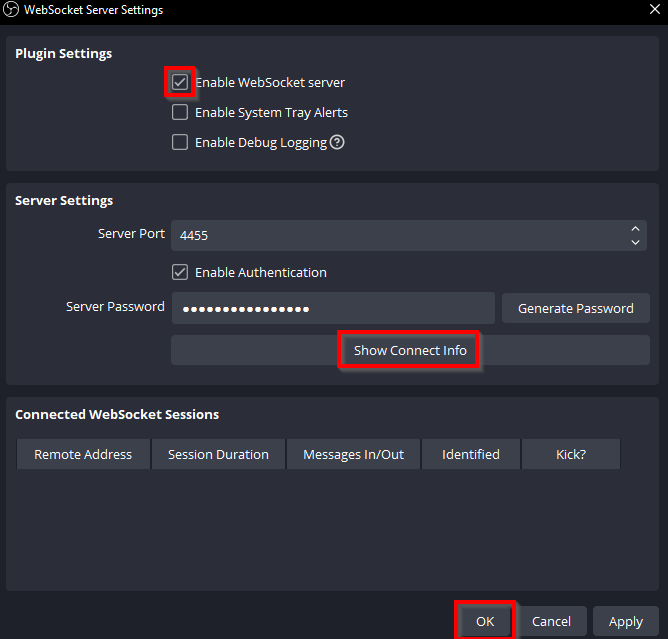
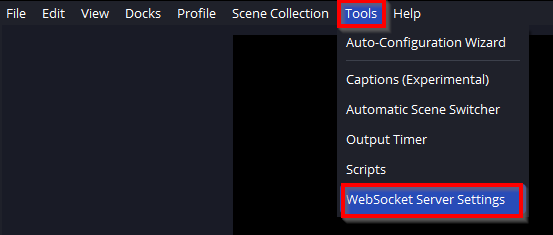
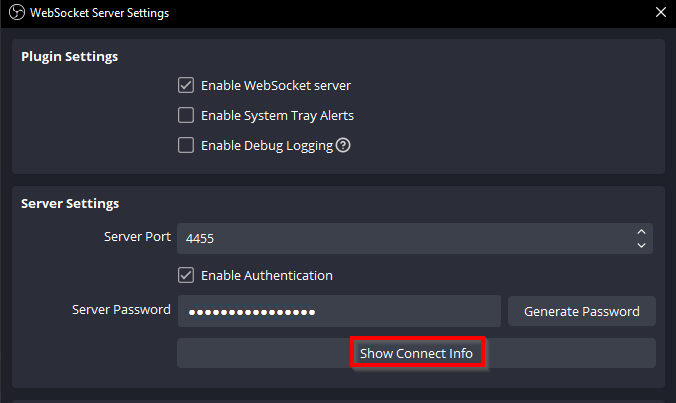
4.1.k – On the top menu bar click on Tools then on Websocket Server Settings. Check the Enable WebSocket Server and hit OK

4.2 NOALBS
[NOTE]
This is the Program that monitors your connections bitrate (via a stats process) and controls OBS via Chat Commands and automatically switches Scenes if Stream from the Phone hits a configured low bitrate or if the connection is lost. The program is unsigned and and will display a Windows UAC dialog box about this. Please run this program at your own risk (it is open source, used by many, and there have been no reports of any malware associated with it and has been safe, this is just a information security note).
4.2.a – Download NOALBS for your System and unpack them to a location of your liking (Recommendation: create a Streaming folder and then a NOALBS Sub-Folder)
4.2.b – Inside this Folder you should have now the following 3 files
- .env
- config.json
- noalbs
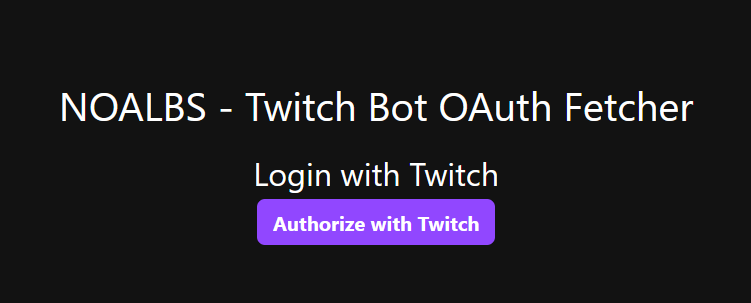
4.2.c – For NOALBS to respond to our Chat commands, we need to give access to a Twitch account. It is suggested to create an alternate Twitch account and use that for the following (if you use your Twitch account that you broadcast from, all NOALBS messages will be under that account name); you can enable the creation of additional accounts from your Twitch Settings under Security and Privacy and toggling on “Enable additional account creation”. Make sure to /mod this alternate account. Once you are logged in with your preferred Account in Twitch, click on this Link, then hit Authorize with Twitch and copy the whole Code from the website

4.2.d – Open the .env File with a Text-Editor
- replace everything with your copied data

- save and close the file
4.2.e – Download the File and replace it with your config.json
config.json
4.2.f – Open the config.json File with a Text-Editor
- replace all 3x of REPLACE_STREAMER_NAME with your Twitch Account Name
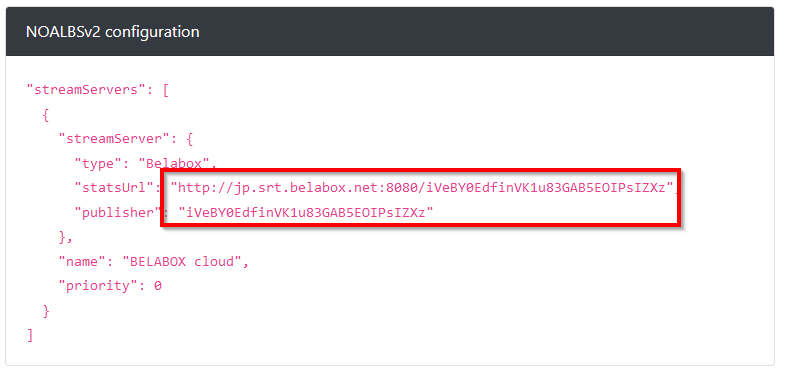
4.2.g – open the Open the Belabox Cloud Page and go to SRT(LA) relays
- Scroll down to NOALBSv2 configuration
- replace REPLACE_BELABOX_URL with the URL from the Belabox Page
- replace REPLACE_BELABOX_INGEST_KEY with the last Part of the URL
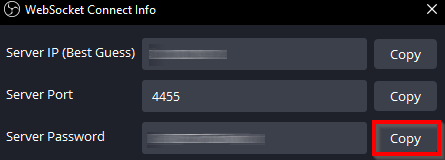
4.2.h – Go back to OBS into the Websocket Settings and click on Show Connect Info.
- Copy the Server Password
- replace REPLACE_OBS_WEBSOCKET_PASSWORD with the copied data
- NOTE: make sure to keep your Websocket connection information safe (never share or reveal that info off/on stream)
4.2.i – Save and close the file. Detailed Infos NOALBS Github
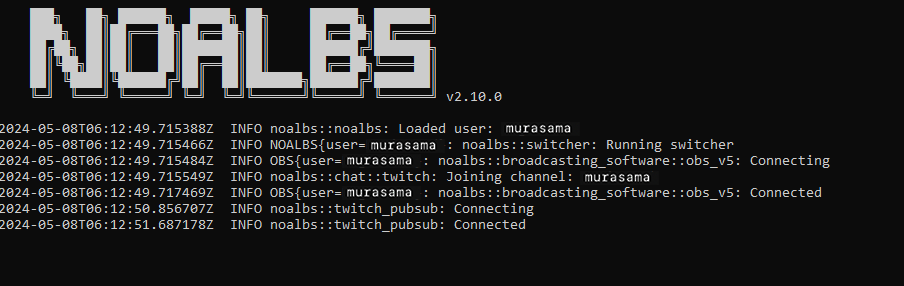
4.2.j – Start the noalbs program. It should look like the picture below. Errors are also shown here
4.2.k – You can create a Shortcut by right-clicking the noalbs file and hit Create Shortcut and drag the Shortcut for example on Desktop for easier access
5 – Customize OBS (optional)
While the above completes the basic Setup, the Scenes are basic placeholders. The following is an explanation on what Scene is used for, and what others normally place in them (via further customization).
[NOTE]
Following are just recommendations. Feel free to design however you want these scenes to look like.
Start
- Every time the Stream starts with this scene until the phone is live
- Video+Music is often used as Background
- Simple Text “Starting Soon …”
Live
- As soon as there is a connection from the Phone to OBS this will be shown
- No additional things needed, since Overlays should run on the Phone
Low
- When connection to the Phone is bad quality
- Simple Text “low bitrate”
Brb
- When the connection to Phone is lost completely or you end the livestream in IRL Pro on purpose (for privacy)
- Old VODs or Clips are often used (For Clips, the suggested recommendation is a Folder named Clips and adding a VLC Media Source requires VLC Media Player) – make sure to download and install the 64-bit version of VLC by manually selecting the download from their site.
- Simple Text “Be right back”
- Can be switched to when you go to the restroom or have private conversations
End
- Can be activated by typing !end in Twitch-Chat
- Similar to Starting Video+Music
- Simple Text “Ending Stream”
6 – Normal Operation
[NOTE]
Before every IRL-Stream, you will need to do the following
6.a – Start your PC at Home an make sure it has a Internet Connection and that the PC doesn’t turn off automatically
6.b – Start OBS & NOALBS on your PC
6.c – Go outside to where you want to start your IRL-Stream
6.d – Enter !start in Twitch-Chat to start Stream to Twitch (this NOALBS defined chat command is like clicking the Start Streaming button in OBS)
6.e – Go Live in IRL Pro -> after a few seconds you are switched to Live-Scene
6.f – If you stop or lose connection on the Phone -> after a few seconds you are switched to Brb-Scene
6.g – As soon as connection from Phone to Internet is restored -> after a few seconds you are switched back to Live-Scene
6.h – End/Start the Livestream manually in IRL Pro to switch between !brb and !live
6.i – Stop the Stream automatically if you raid someone or with Chat command !stop (this NOALBS defined chat command like clicking the Stop Streaming button in OBS)
[IMPORTANT]
With every Scene Change in OBS you will see a text message in Chat
7 – 2nd Internet Connection
[NOTE]
This is optional and improves stream stability/quality a lot in many cases. But it doesn’t prevent disconnect outages in No Service Areas like deep into the Mountains or Tunnels.
As seen in the Map there can be 2nd Internet Connection for your phone to reduce the chance of disconnect outages for the Live Stream. Either a Mobile WiFi Router or a Second Phone with Mobile Hotspot active.
[IMPORTANT]
For this second SIM a different Provider is highly recommended. The 2nd Sim will also consume about ~50% of the overall Data
8 – Stream directly to Twitch
If for whatever reason the Relay or Home PC is not working, you can easily switch back to a direct Streaming configuration in the IRL Pro App.
8.a – Go to Settings > Connections and Switch Belabox off and Twitch on
8.b – Go back to Settings then Video. Scroll down and turn Bitrate matches resolution back on and Format to Auto.
9 – Additional Help
IRL Pro App
Here is their Discord
OBS
you can check their Forum or just look up one of the hundreds of YouTube Tutorials
NOALBS
Here is their Guide on Github and their Discord
Note: forked and modified from: https://github.com/Naginreed/irl-cae_Android-Win